Hey there, docs wizard in the making! If you've ever found yourself scratching your head over margins in Google Docs or any other document editor, you're in the right place. Margin in Docs might seem like a tiny detail, but it can make or break the readability and professionalism of your work. Whether you're creating a school assignment, a business proposal, or just trying to format your novel, understanding how to manipulate margins is key. Let's dive into the world of margins and uncover all the secrets that'll take your document game to the next level.
Imagine this: you've spent hours crafting the perfect essay, only to realize the margins are all over the place. Suddenly, your masterpiece looks like a jumbled mess. Sound familiar? Don’t worry, because by the time you finish reading this, you’ll be a margin master. This guide is packed with actionable tips, tricks, and insights to help you conquer margins in Docs once and for all.
Before we get into the nitty-gritty, let me ask you something. Have you ever wondered why margins matter so much? It’s not just about aesthetics—it’s about functionality. Proper margins ensure your document is easy to read, fits perfectly on the page, and looks polished. Let’s explore everything you need to know about margins in Docs and how they can elevate your document design game. Ready? Let’s go!
Read also:Martin Kretz Age A Comprehensive Dive Into The Life Of An Influential Figure
Understanding the Basics of Margin in Docs
First things first, what exactly are margins in Docs? Simply put, margins are the empty spaces around the edges of your document. They act as a buffer zone between your text and the edge of the page. Think of them as the invisible borders that keep your content organized and readable. Without proper margins, your text might spill off the page, making it look cluttered and unprofessional.
Margins in Docs are measured in inches or centimeters, depending on your preference. By default, Google Docs sets the margins at 1 inch on all sides, but don’t worry—you can customize them to fit your needs. Whether you’re working on a narrow-columned newspaper-style layout or a wide-margin academic paper, Docs has got you covered.
Here’s a quick rundown of the different types of margins you’ll encounter:
- Top Margin: The space above your document’s header.
- Bottom Margin: The space below your footer.
- Left Margin: The space on the left side of your text.
- Right Margin: The space on the right side of your text.
Why Are Margins So Important in Document Design?
Margins might seem like an afterthought, but they play a crucial role in document design. They influence how your content is perceived and how easy it is to read. A well-balanced margin setup can enhance readability, create a professional appearance, and even save paper when printing. On the flip side, poorly managed margins can lead to a chaotic layout that confuses readers.
Let’s break down why margins matter:
- Readability: Proper margins ensure your text isn’t cramped, giving readers enough breathing room to focus on the content.
- Professionalism: Documents with consistent and appropriate margins look polished and organized, which is essential for business or academic purposes.
- Printing Efficiency: Adjusting margins can reduce paper waste and save ink, especially if you’re printing large documents.
So, the next time you’re tempted to skip the margin settings, remember that they’re the foundation of a great document. Now that we’ve established their importance, let’s dive into how you can customize them in Docs.
Read also:Elyse Smith Married The Ultimate Guide To Love Fame And Everything Inbetween
How to Adjust Margins in Google Docs
Adjusting margins in Google Docs is a breeze, thanks to its user-friendly interface. Here’s a step-by-step guide to help you tweak those margins to perfection:
Method 1: Using the Ruler
- Open your Google Docs document.
- Look at the top of your page for the ruler. If you don’t see it, click on "View" and check "Show Ruler."
- Drag the margin markers (the blue triangles and gray bars) to adjust the top, bottom, left, and right margins.
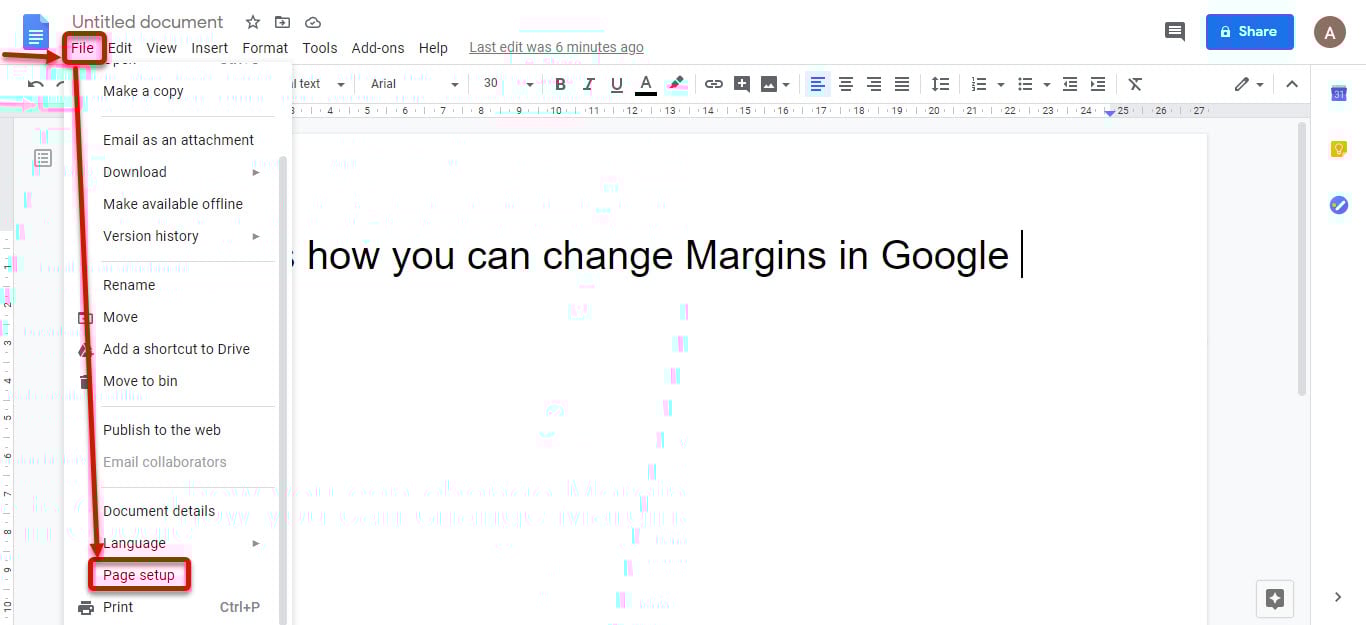
Method 2: Using the File Menu
- Go to "File" in the top menu.
- Select "Page setup" from the dropdown list.
- In the dialog box, enter your desired margin values for top, bottom, left, and right.
- Click "OK" to apply the changes.
Both methods are equally effective, so choose the one that feels more intuitive to you. Experiment with different margin sizes to see what works best for your document type.
Common Mistakes When Setting Margins in Docs
Even the most experienced Docs users can make mistakes when setting margins. Here are some common pitfalls to watch out for:
- Ignoring Default Settings: While the default 1-inch margins work for most documents, they might not be ideal for every project. Always consider the purpose of your document before sticking to the defaults.
- Overdoing It: Setting margins too wide or too narrow can disrupt the flow of your content. Strive for balance—leave enough space for readability but not so much that your document looks empty.
- Forgetting Print Constraints: If you plan to print your document, remember that some printers can’t print right to the edge of the paper. Adjust your margins accordingly to avoid cutting off important content.
By being aware of these common mistakes, you can avoid frustration and create documents that look exactly how you envision them.
Advanced Tips for Customizing Margins
Once you’ve mastered the basics, it’s time to level up your margin skills. Here are some advanced tips to help you take full control of your document layout:
Tip 1: Use Custom Margins for Different Sections
Did you know you can set different margins for different sections of your document? This is especially useful for reports or books where you want varying layouts. Simply insert a section break, then adjust the margins for each section individually.
Tip 2: Add Bleed Margins for Printing
If you’re designing a document for print, consider adding bleed margins. These are extra margins that extend beyond the trim edge of the page, ensuring your design looks flawless even after cutting.
Tip 3: Experiment with Asymmetric Margins
Not all documents need symmetrical margins. For creative projects, try experimenting with asymmetric margins to create a unique visual effect. Just make sure it aligns with the overall design of your document.
How to Use Margins for Academic Papers
Academic papers often require specific margin settings to meet formatting guidelines. Here’s how you can set up your margins for common academic styles:
- MLA Format: Set 1-inch margins on all sides.
- APA Format: Same as MLA—1-inch margins on all sides.
- Chicago Style: Also 1-inch margins, but check with your instructor for any additional requirements.
Remember, consistency is key in academic writing. Stick to the required margin settings throughout your document to ensure compliance with formatting rules.
Troubleshooting Margin Issues in Docs
Encountering margin problems in Docs? Don’t panic! Here are some solutions to common issues:
- Margins Won’t Change: Make sure you’re not working in a protected section of the document. Also, check if the ruler is visible and properly adjusted.
- Text Overlaps Margins: This usually happens if you’ve inserted objects or images with incorrect alignment. Adjust their placement to fit within the margins.
- Printed Margins Don’t Match: Ensure your printer settings are aligned with your document’s margin settings. Sometimes, printers have their own default margins that need to be adjusted.
By troubleshooting these issues, you’ll save yourself a lot of headaches and ensure your documents look exactly as intended.
Best Practices for Margin in Docs
Here are some best practices to keep in mind when working with margins in Docs:
- Plan Ahead: Decide on your margin settings before you start typing. This prevents the need to reformat your document later.
- Consistency is Key: Stick to the same margin settings throughout your document unless you have a specific reason to change them.
- Test Before Printing: Always do a test print to ensure your margins are correct and your content fits within the page boundaries.
Following these best practices will help you create documents that are not only functional but also visually appealing.
How to Optimize Margins for Mobile Devices
With more people accessing documents on mobile devices, it’s important to optimize your margins for smaller screens. Here’s how:
- Use Narrower Margins: This ensures your content fits comfortably on the screen without requiring excessive scrolling.
- Avoid Large Images: Large images can push text outside the margins on mobile devices. Resize them to fit within the margin boundaries.
- Test on Multiple Devices: Preview your document on different mobile devices to ensure it looks good across all platforms.
By optimizing your margins for mobile, you can ensure your documents are accessible and readable no matter where they’re viewed.
Conclusion: Take Your Document Game to the Next Level
There you have it—a comprehensive guide to mastering margins in Docs. From understanding the basics to troubleshooting common issues, you now have all the tools you need to create documents that look professional and polished. Remember, margins might seem like a small detail, but they play a big role in the overall quality of your work.
So, what are you waiting for? Go ahead and experiment with different margin settings to find what works best for your projects. And don’t forget to share this guide with your friends and colleagues who might be struggling with their document margins. Together, let’s elevate our document design skills and take our work to the next level!
Table of Contents
- Understanding the Basics of Margin in Docs
- Why Are Margins So Important in Document Design?
- How to Adjust Margins in Google Docs
- Common Mistakes When Setting Margins in Docs
- Advanced Tips for Customizing Margins
- How to Use Margins for Academic Papers
- Troubleshooting Margin Issues in Docs
- Best Practices for Margin in Docs
- How to Optimize Margins for Mobile Devices
- Conclusion: Take Your Document Game to the Next Level